Sunday, November 20, 2016

An album made using templates!

I've been having so much fun making
albums lately!  Last month I shared a flip book
I made using templates from Jenofeve Designs.
I've now made several of them.  :)

I purchased "Stack the Page" album templates from Jennifer
so now I've been making albums, too.  She makes it so easy to build and create albums
and I'm thrilled to have found them!!

Link to Jennifer's Etsy Store
and her templates here.


I made my first album with DP from
Graphic 45: By the Sea Collection.
The album measures 6 5/8" tall x 4 7/8" wide.
The spine is 1 1/2" wide.


NOTE:  This album and another now for sale on my blog!


**Please click on photos to enlarge them**

Front cover

To give it some texture, I cut out the image
of the woman and layered her over
the base cover, and then did the same
with the shells.
The cover is sealed with Ranger Multi Mat Medium.

The album has six double-sided pages
( and it contains several pockets, flaps, 
inserts, tags, and booklets.  I left lots of room for
photos and journaling.


Inside cover and first page
The inside cover has a pocket which contains
a booklet with 4 sheets of paper to journal on
and a cut-apart from the collection.  I did some stamping
on the cover of the booklet and on the first page of the booklet.

The first page has a pocket with an envelope
which contains a double tag.

 
Second and third pages

On the left, you see a stamped pocket
which contains an envelope with a small booklet.
The booklet has four pages of paper on which to journal.
There is, also, a cut-apart tag from the collection.

On the right, under that belly band, are 3 small
envelopes, each containing a small insert for
photos or journaling.

There is a tabbed booklet (with paper for journaling)
in the pocket which sits between the third and fourth pages.

Fourth and fifth pages

On the left (page 4), is a flap with an embellished paper clip.
When you open the flap, you will see a cut-apart tag
from the collection and plenty of room for photos.

On the right (page five), you can see a pocket
with a flip tag and in the pocket
is a cut-apart tag from the collection.

Sixth and seventh pages

On the left (page 6), is a blank page for a photo,
if you desire, or to leave as is for the beautiful
images in the paper.

On the right (page 7), I left this blank as well.
I just couldn't cover that beautiful paper!  :)
I did add a flap, however!

Between pages six and seven,
I placed a tabbed booklet (with journaling paper).


Pages Eight and Nine

On page eight, there is a tuck spot with
a cut-apart tag from the collection.

On page nine, you'll see a blank page
with an embellished paperclip.

Pages Ten and Eleven

On page 10 is a pocket containing an envelope
which contains a double tag.  Behind the envelope
is a cut-apart tag from the collection.

On page 11, you can see a belly band holding
two small envelopes and a tabbed booklet
which contains paper for journaling.

 Page Twelve and inside back cover

What you see on the left, is a flap which
has an envelope and tag on it.  Once you open the flap
you see a cut-apart tag from the collection
 The opposite side of the flap has Designer Paper on it.

On the back cover, there is a tabbed booklet
with paper for journaling in it.

Thank you for stopping by to see what I've been making.

I will be back shortly to share another album!

⊰⊹✿ Marilou ✿⊹⊱

Tuesday, October 18, 2016

Fun with templates!

Hello, Friend!

I love to watch YouTube videos,
just in case you didn't know that.  ;)

One night I found a something that I got really excited about!
I discovered "jen of eve Designs"
and the wonderful templates Jennifer creates
to make lovely gifts and albums.

Let me share with you what I just completed.

It's called a "Flip Book" and here's my take on one:

Front Cover

**click photo to enlarge it**
Inside front cover 

This is the middle of the book

This one shows all the flaps opened up on inside


Same shot, but with flap 2nd from left lifted up
to reveal what's under it. 
Inside back cover

Back cover

Tags and crafty "goody" bags I made to insert into this book
and gifting to a long-time crafty friend


About Jennifer:  (from her YT channel)
"One of my favorite things to do is design and develop printable
 albums and templates for you to print and make with ease!
  All of my printable albums and templates are made by hand
by me, not digitally!  I am very proud of them
and I am constantly working on a new idea
to bring to you all!!

**

I like them because they are so versitile and easy to use.
You can either print them directly to your DP preference
or print them on plain cardstock and mat them yourself.

Start by checking out
Jennifer's YouTube Channel here.

Jennifer sells her templates here on Etsy.

Jennifer's Facebook page here.

She has lots of crafty tips and tricks to share with you, too!!

Have fun!!

Thanks for stopping by to see what
I've been up to!


⊰⊹✿ Marilou ✿⊹⊱

Wednesday, October 12, 2016

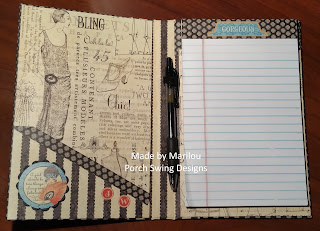
Note Pad Holders and exciting news!

I've been making lots of Note Pad Holders
aka Steno Pad Holders and BOY are they ever
fun to make!

Once I made my first one I was hooked
because they are so addicting to make,
embellish and use and they are refillable!!
Here is the front cover of my Asian-inspired book.
 It was handmade with Graphic 45 papers
called "Birdsong."

**Please click on photos to enlarge them**

Inside with steno pad and pocket

This is my own personal Note Pad holder,
made using my favorite G45 
"A Ladies Diary" Collection.

Inside


One more for now!
This one was made for a wonderful family member.

Cover


Inside

AND NOW for the exciting news!

I've just opened a new page on PSD
and I hope you will take the time check it out.

You will see that I'm now selling kits so please go take a look!!

Thanks for stopping by!

⊰⊹✿ Marilou ✿⊹⊱

Sunday, October 2, 2016

Fun with bound journals and books!

New projects to share with you today!

I've been having a lot of creative fun
making various books and journals
using different Graphic 45 Collections.

First, I realized that my password book was
seriously outdated and over 4 years old,
so I made myself a new one.

My favorite G45 Collection of all time
is the "A Ladies Diary Collection" and
it's what I've used to create many useful
and beautiful items for my craft space.

My new password book:

Front cover
(click on photo to enlarge)

It's a coil-bound book, made of fairly thick
chipboard, which I covered with G45 "A Ladies Diary."
It has several dividers and pages with room to
write in many sites and my passwords for those sites.

While my older PW book was only 4 3/4" x 4"
this one is much larger and measures 9" x 6 1/4"
and will hold more info.  I really like
how it turned out and hope it will inspire
YOU to make one too.


Inside

(click on photo to enlarge)

On the inside cover on every divider page,
I used one of the beautiful stamps that
came with the G45 Collection
and Ranger Distress Vintage Photo Ink to stamp.

I made tabs for the dividers using
Taylored Expressions
"Keeping Tabs."

When finished with all the pages, I used my Cinch to bind it.

That was so much fun!!

Thanks for stopping by.

⊰⊹✿ Marilou ✿⊹⊱

Tuesday, September 20, 2016

Cards!!

I've been having so much fun making cards again!!

Woo Hoo!!  It's been so long, but I'm getting

my craft room set up again, and I'm enjoying

all my crafting time.


BTW, you'll find some of my cards my "For Sale" page,

here on my blog.
I wanted to share one with you that I really liked.

I used a Saturated Canary image, called the Librarian:

(please click on image to enlarge it)

She was SO much fun to color up and make into a card.

I used Copic Markers to color her.

Thanks for stopping by to see what's new on my blog!

Please stop by again soon!
⊰⊹✿ Marilou ✿⊹⊱

Wednesday, June 22, 2016

G45 Voyage Beneath the Sea Folio Album

For the first time in several years, I taught a class today!
(please click on photo to enlarge it)

I love this paper line, with the turquoise,
coral and green coloration.

The right side of the album has 7 waterfall flaps
and it has a pocket on the left with 3 slim tags

and one large tag.  You'll find lots of room
to journal and for your photos,
making it a great album for
your summer beach photos!


At the end of my post is a link to the YouTube video that inspired my album.  To make it easier for you, I'm including the measurements for the album here:


Supplies needed to assemble folio:

1 - 12” x 12” medium weight Chipboard

1 – 12” x 12” DP for cover
1 – 12” x 12” DP for inside cover

3 - 12” x 12” Solid color Cardstock for base of pocket and waterfall pages and Tags

3 – 12” x 12” DP for waterfall flaps (3 different selections) and Tag DP


1 – 12” x 12” DP for pocket cover (or use scraps)


C
utting:

Chipboard
:  2 – 4 ½” x 8 ½” and 1 – 3/4” x 8 ½”  (for album base)

Cardstock
:
Waterfall base:  Cut 1 – 7 ¾” x 4”  Corner Punch bottom corners only

Waterfall flaps:  Cut 7 – 4” x 4 ½” Corner Punch bottom corners only

Tags:  Cut 4:  3 regular tags and one square with punched corners from scraps.

Inside left cover Pocket base:  1 – 5 ½” x 4 ½”
Designer Paper:
Front Cover:  Cut 1 - 12” x 10 ½”

Inside cover:  Cut 1 - 8 ½” x 9 5/8”

Flaps:  15 - 3 ¾” x 3 ¾”  from several different DP selections.  Punch bottom of fronts and top of backs
Strips:  7 – 3/8” x 3 ¾” (you can use same DP as cover or as desired)
Pocket:  1 – 3 ¾” x 4 ¾”  then cut angle


The following video, from "My Sisters Scrapper," inspired my album:

https://www.youtube.com/watch?v=pLbHLZUAPeo 


Thank you for stopping by to take a look at
what I'm currently working on!

Please stop by again soon!

⊰⊹✿ Marilou ✿⊹⊱