
Hello dear friend!
I'm so thrilled that you stopped by my blog
today, as I have just completed a huge project
and I can't wait to share it with you!!
This is my Graphic 45 "A Ladies Diary Journal in a Box"
and I have loads of photos to share with you today,
so grab a cup of tea and settle in for a bit!!
I know I've already mentioned, many times,
I know I've already mentioned, many times,
my great love for all things vintage, right? LOL
Well, I wandered into my favorite scrapbook shop,
Well, I wandered into my favorite scrapbook shop,
Memories of Time, one day and I know my mouth
must have flown open when I
saw this gorgeous paper collection by Graphic 45!!
I was immediately smitten and knew
another album was in my future. =)
THEN, when "wandering" through YouTube,
I found an amazing tutorial by
"Angelwings14100" aka Marianna with
THEN, when "wandering" through YouTube,
I found an amazing tutorial by
"Angelwings14100" aka Marianna with
instructions for making this journal!!
SCORE!! :)
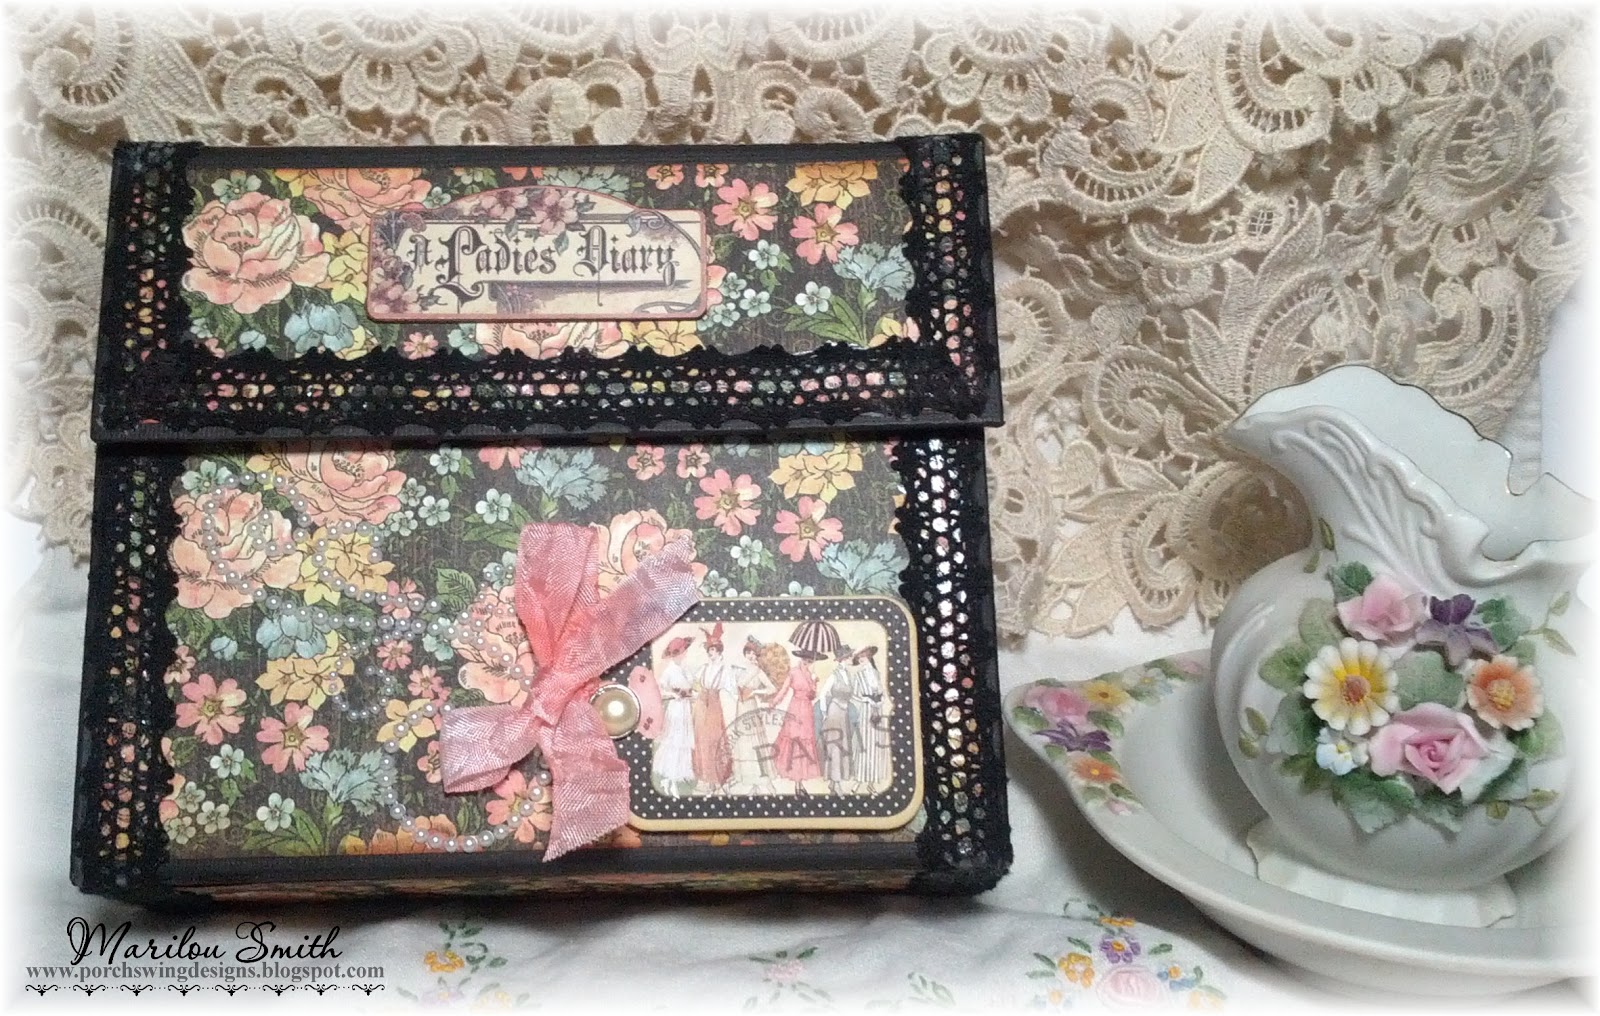
SO, this is my version as it appears
from the front. It has magnet closures
to hold the two flaps together.
*All the photos are clickable*
When it's opened up, it reveals three flaps
with pockets that hold "tag pockets"
with tags in them. I've removed the tags,
for this photo, so you can see the basic album.
The light blue area on the right is
the outside of flap #1 and
the light blue area on the left
is the outside of flap #3. Flap #2 and #3
have a ribbon closure.

With flap #1 open, you can see the inside of it,
and the vertical pocket, with a vintage lady
I fussy cut and placed on it.
The pocket holds an address book.

This photo shows you the inside cover
of the Address Book and it's first page.

On the left is the peach inside of flap #3,
and the area with the beautiful lady dressed
in light blue and peach is the outside of flap #2.

With flap #2 and #3 opened up, you can see that
within this area is my tag journal/diary. I'll show
you more of it further down the page. =)

Now let's look at it with the tags in place.
Here's the inside of flap #3
with it's tag included.

Here's the outside of flap #3 and inside of flap #2
with their tags included.

This is the vertical pocket, again, with the inside
of flap #1, and it's tag, on the right.
I sure love all the vintage hats!!I'm sorry it's a bit blurry. :(

This photo shows you the outside of flap #1,
and it's tag. (Sorry about the glare!)

Now, let's take a closer look at the Tag Journal.
This is the front cover and the Journal is
laced together with glittery cording.

Here's the first page of my Tag Journal.
I used stamps from the collection
to embellish my tags.

Page 3 and 4 of my Tag Journal.
The vintage dress form is a Silhouette file.

Pages 5 of my Tag Journal
has a the little envelope (and it's tag)
that I made using my Silhouette.
Page 6 is a pocket envie that holds
a tag on it's side
and another one on the other side

Page 7 is the other side of the tag pocket
and can be used for photos or mementos.
Page 8 is a pocket
with Library due date tags in it.

Page 9 has another envelope and tag
made with my Silhouette
and stamped with flourishes.
Page 10 is a pocket holding a tag with
the peach border and ribbon on it. The face
of the pocket is another opportunity
for a photo placement.
Although I'm not sure I want to hide the
beautiful papers!!

Page 12 is a handsome vintage
gentleman striking a pose, and will stay
just like that! ;)
Page 12 is another tag donning
a seam binding ribbon that I dyed
with my Copic Markers.
I did both the peach and light blue
ribbons the same way.
Somehow, I missed photoing
Page 14, but it's a simple photo
or journaling spot.

~Last of all, I've photo'd all the tags~
From the Album:
From the Album:


And from the Tag Journal:

Box Album size:
Closed: 7 1/4" wide, 6 1/2" tall and 2 1/4 deep.
Open: 24" wide (with flap #3 open) and 7 1/4" tall.
Cardstock used to create my album base:
Bazzill Linen in Raven
Patterned Papers used:
Graphic 45: A Ladies Diary Collection
Stamps used: from the same collection
Stickers and Chipboard pieces:
from the same collection
Embellishments
Hand dyed Seam binding
Black Lace (from MOT)
Black Ribbon for tie closure
2 - 1/2" magnet sets
American Crafts Pearl Brads
Dies:
Impression Obession Dies - DIEO 17-V
Punches used:
Martha Stewart Punch around the corner
Eyelet Lace
Tonic Studio Corner Punch
Tools used:
Silhouette
Big Shot
My Computer
Microsoft Digital Image Pro 10
HP PhotoSmart Printer
I owe BIG thanks to
Mariana Brulja
from Australia
from Australia
who made a wonderful YouTube Tutorial
of her "Album in a Box" and
then made two additional
tutorials with instructions to make it!!
Please take a look at her's!!http://www.youtube.com/watch?v=ZpuiLx-bH_E&feature=relmfu
Please take a look at her's!!http://www.youtube.com/watch?v=ZpuiLx-bH_E&feature=relmfu
Tutorial 1:
Tutorial 2:
Please NOTE:
Her dimensions for the flaps
in the tutorials, are incorrect.
I spoke with her by email,
and here's the correct sizes:
Flap #1: 6 3/4" x 7 1/4"
Flap #2: 6 1/4" x 7 1/4"
Flap #3: 5 3/4" x 7 1/4"
Thank you, from the bottom of my widdle heart,
for stopping by to see what I've been making!
I hope your day is blessed!
╰⊰⊹✿ Marilou ✿⊹⊱╮


